Video Still Tutorial Walkthrough:
These instructions are for Premier Pro CC.
Download the folder Ballooning Premier Demo DOWNLOAD from IU.app.box.com
THESE NEXT STEPS ARE VERY IMPORTANT! YOU WILL HAVE LOTS OF PROBLEMS IF YOU DO NOT FOLLOW THEM EXACTLY.
GOT-YA: Some computers download the folder in the "zipped" compressed format (in the icon view, the folder appears with a zipper). Before you can proceed, right click on the folder and choose Extract or Unzip.
Open the folder and locate the file named Ballooning Still Demo PPCC.prproj
Replace the word Demo with your name - example: Ballooning Still Sweitzer PPCC.prproj. Double click that file to open it in Premier.
If you can't rename the file, it's because it's still zipped. See GOT-YA above.
Before it open completely you will see a window that tells you this project was created with a previous version of Premier Pro CC and it will ask you if you want to save it as a new file called Ballooning Still YourLastName PPCC_1 choose OK (If you forgot to name the file before you opened it, you can name it now Ballooning Still YourLastName PPCC_1) and it should then open Premier and you can start editing. THIS IS THE FILE YOU WILL UPLOAD and without your name I won't be able to give you a grade.
If the program starts to load but then says it can't find a file and asks you to locate it, you must navigate to the Ballooning Premier Demo DOWNLOAD folder you downloaded. The file will be in either the Stills folder or the Audio folder - if you don't see those folders, you didn't download the Ballooning Premier Demo DOWNLOAD folder. Once you select the requested file, everything should load up properly. If you don't follow these directions, the program will open with a bunch of screens showing a strange languages. If that happens, exit the program and double click on Ballooning Still YourLastName PPCC_1 and follow the instructions above.
When you are finished with this tutorial, you will upload the file (NOT THE WHOLE FOLDER) Ballooning YourLastName PPCC_1 to the Ballooning Tutorial folder inside the J210 Spring 2017 folder in IUBox.
***********************
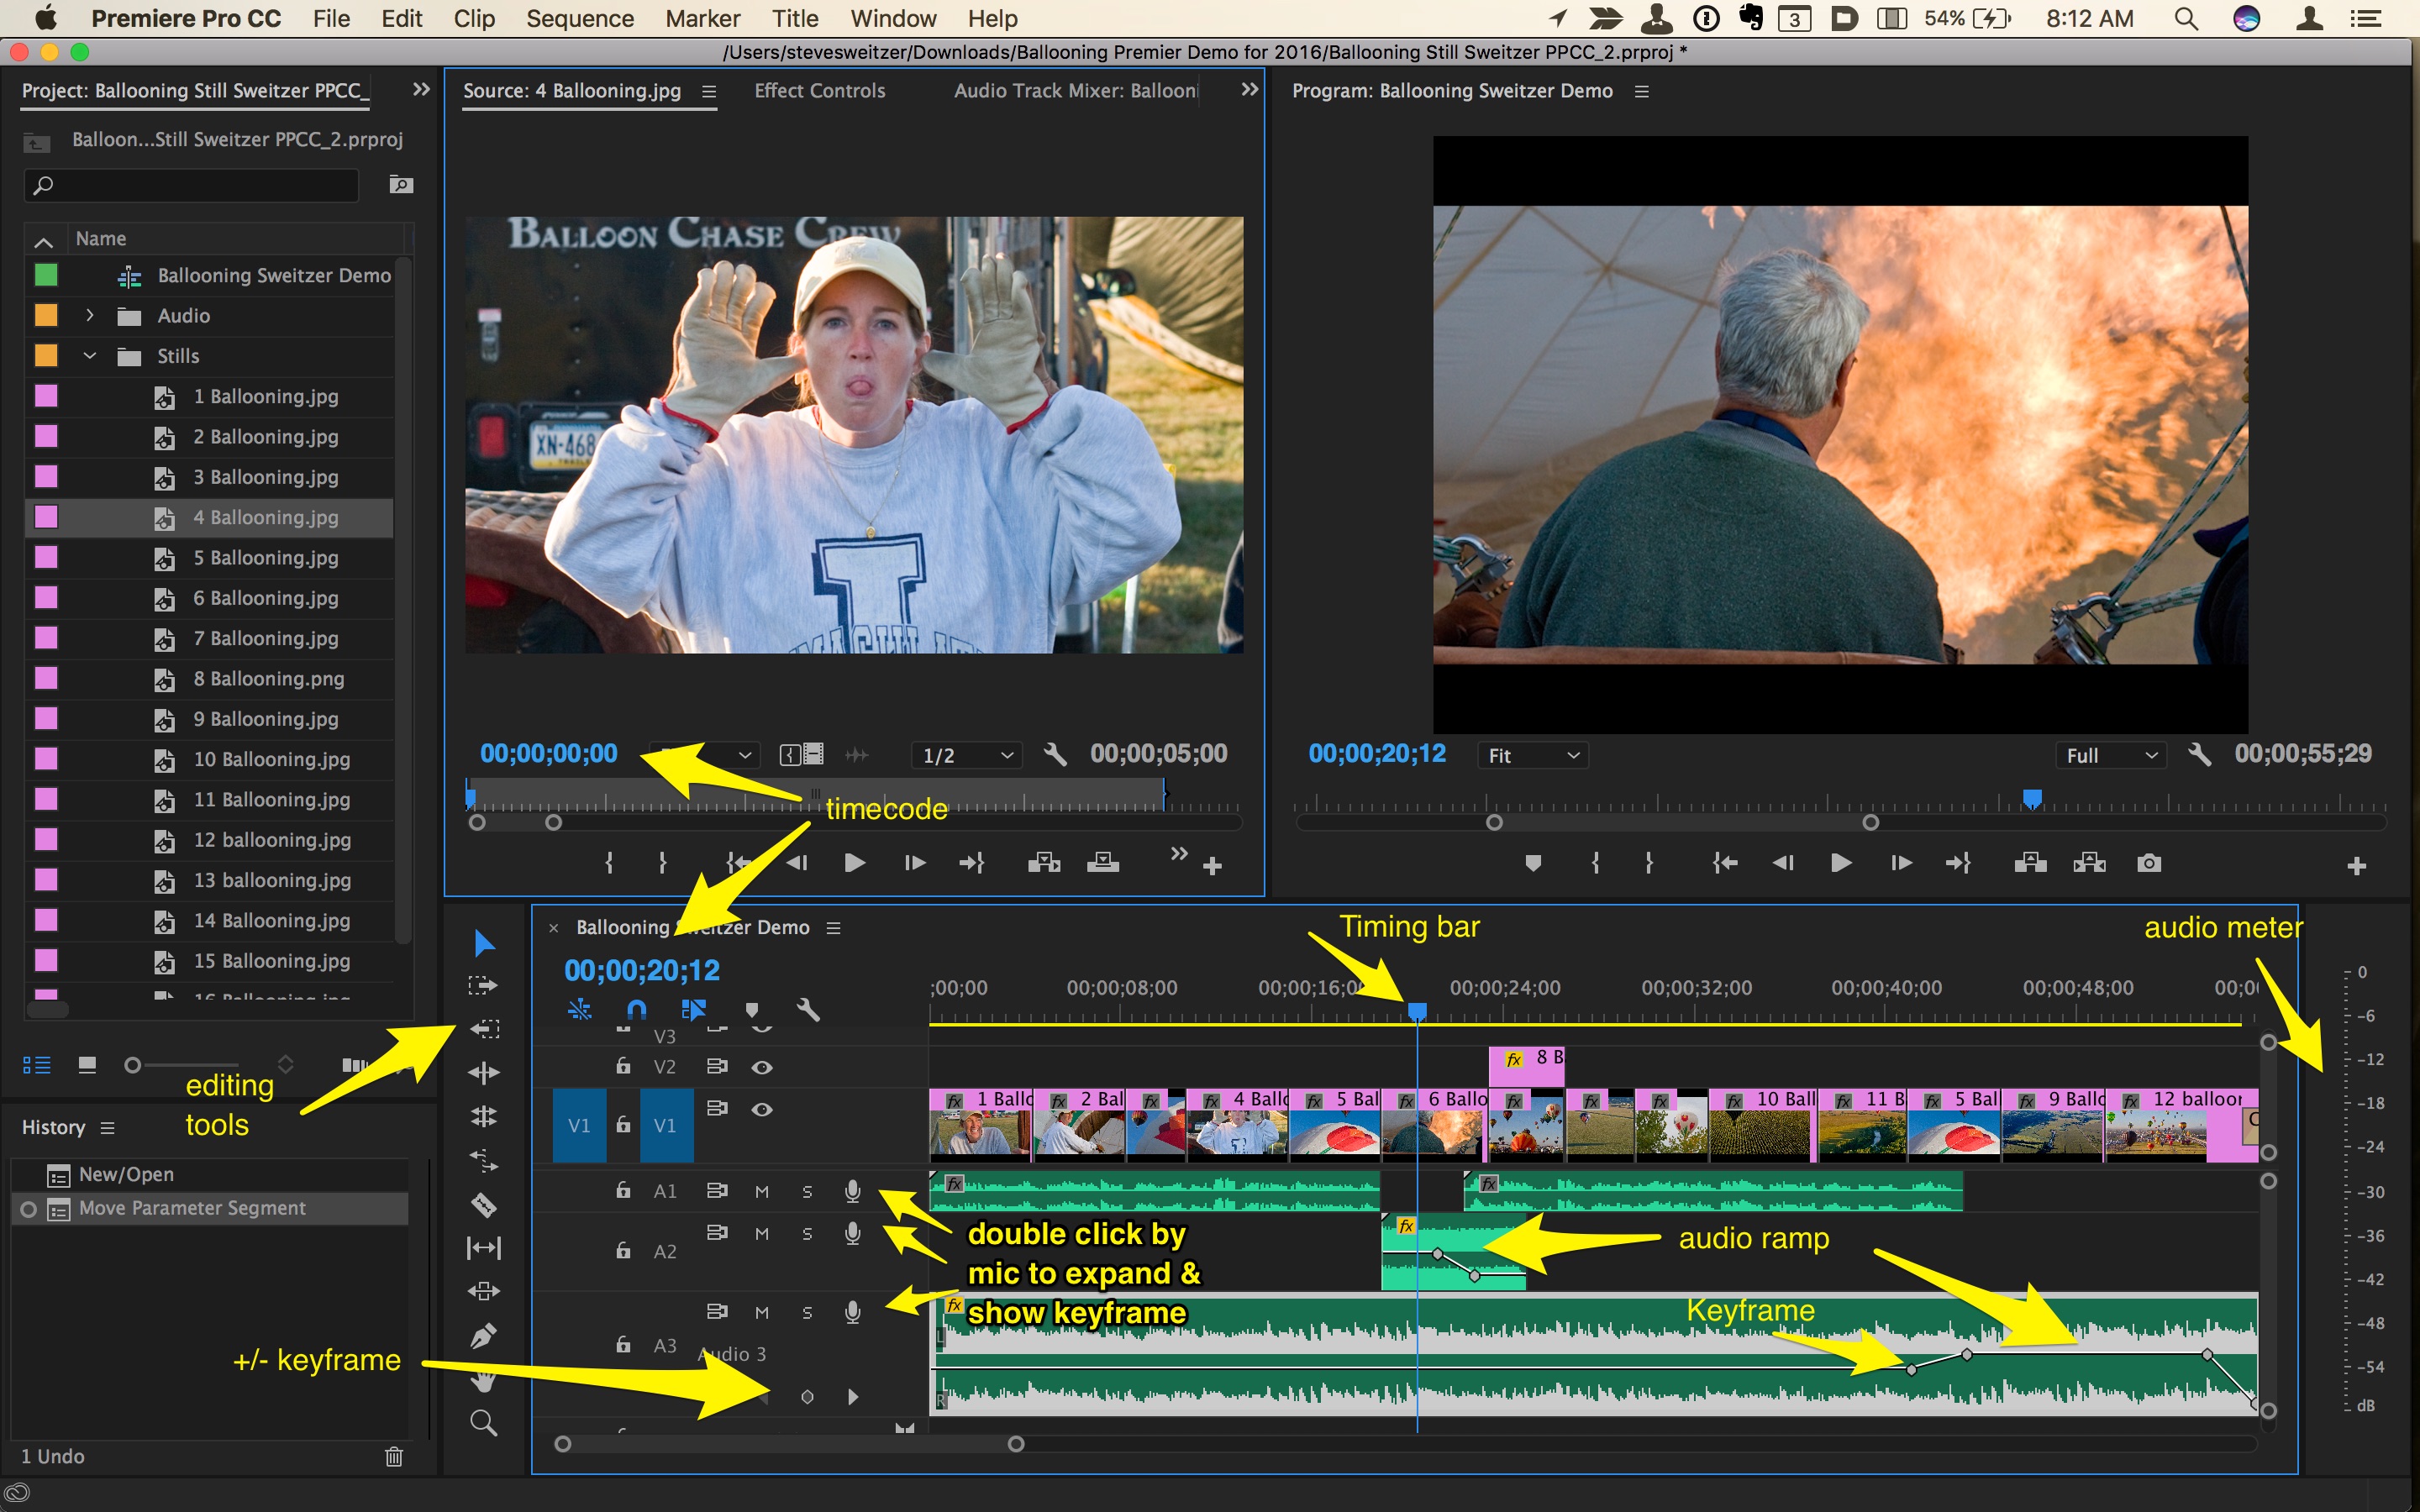
This is the way your finished project will look. Now it’s time for you to create your own sequence.
Choose File/New/Sequence and at the bottom of the window that opens, type Ballooning YourLastName and tap OK.
In the Sequence Window you should now have a blank sequence and new tab the says Ballooning YourLastName in addition to the tab for Ballooning Sweitzer Demo. You can have several sequences open at the same time and move between them by clicking on the tab. You can even copy and paste clips and segments between sequences. If you're not sure what your project should look like, you can click on the tab for Ballooning Sweitzer Demo to see my version of the assignment.
Building Your Sequence
- In the box in the upper left of Premier, find the Audio folder and double click on it.
- Click on the Files Jennifer 1 and, while holding the mouse down, drag it to the left most position of track A1.
- You will need to expand the A1 track so you can see the Add-Remove Keyframe button. Look at the picture of the timeline above... double click in gray area of A1 right next to the icon of the microphone. This will expand the track so you can see the Add-Remove Keyframe button.
- Now tap the \ key to make the clip fill the timeline. (Regardless how large your story becomes, the \ key will always make it fit into the window.)
- Close the Bin: Audio and double click the Stills folder to open it.
- Resize it and move it around so it’s not in the way of the Preview playback window.
Add Clips:
Next, we’ll explore various ways to add and adjust clips in the Timeline.
- Click on 1 Ballooning and while holding down the mouse and drag it into the left side of V1 track in the Timeline.
- Make sure the timing bar is all the way to the left of the Timeline. Tap the Space bar to play the video and tap it again when you hear “…live in Dansville, New York.” to stop the playback. In the upper left hand corner of the Timeline the blue Timecode should be roughly 00:00:04:11.
- Hover the pointer over the right end of the 1 Ballooning clip, until it changes to an arrow pointing left. Click on the end of the clip and drag it to the left until it snaps to the Timing Bar.
- Next, we'll use the In cue and Out cue to place a clip. Without
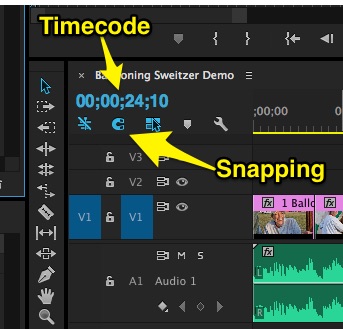 moving the timing bar type I to set the In cue (if you’ve moved the Timing Bar, move it back to the end of the 1 Ballooning clip – 00:00:04:11.)
- Tap the Space Bar to play the clip until you hear “I ever went ballooning.” and tap the Space Bar to pause.
- Type O for Out cue. The Timecode should be about 00:00:08:09. Notice the area between the In cue and Out cue is light gray in the Timeline.
- In the Bin: Stills click on 2 Ballooning. Add that clip to the Timeline by typing “.” (period). When the Fit Clip window opens, check the Ignore Source Out point and click on OK. Notice how the clip fits exactly into the slot we created by marking an In and Out point?
- Click on 3 Ballooning and while holding the cmd key, click on 4 Ballooning. Now, click on the clip (or picture portion of either clip if in the icon view) and while holding down the mouse, drag the clips to the Timeline and snug the two clips up against 2 Ballooning in the Timeline.
-
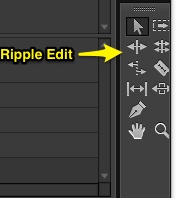 Tap the Space Bar and play until you hear “… scared in my life.” and tap the Space Bar again to stop (should be about 00:00:11:02). Look at the Toolbox and select the Ripple Edit Tool or just type B to activate the tool.
NOTE:
In the latest version of Premier they have changed the way to tool bar looks and behaves. Now, fewer tools appear but if you click and hold the the mouse on the tiny corner triangle you will get a break out menu showing other tools. The good news is that the keyboard shortcut keys also work for accessing the various tools.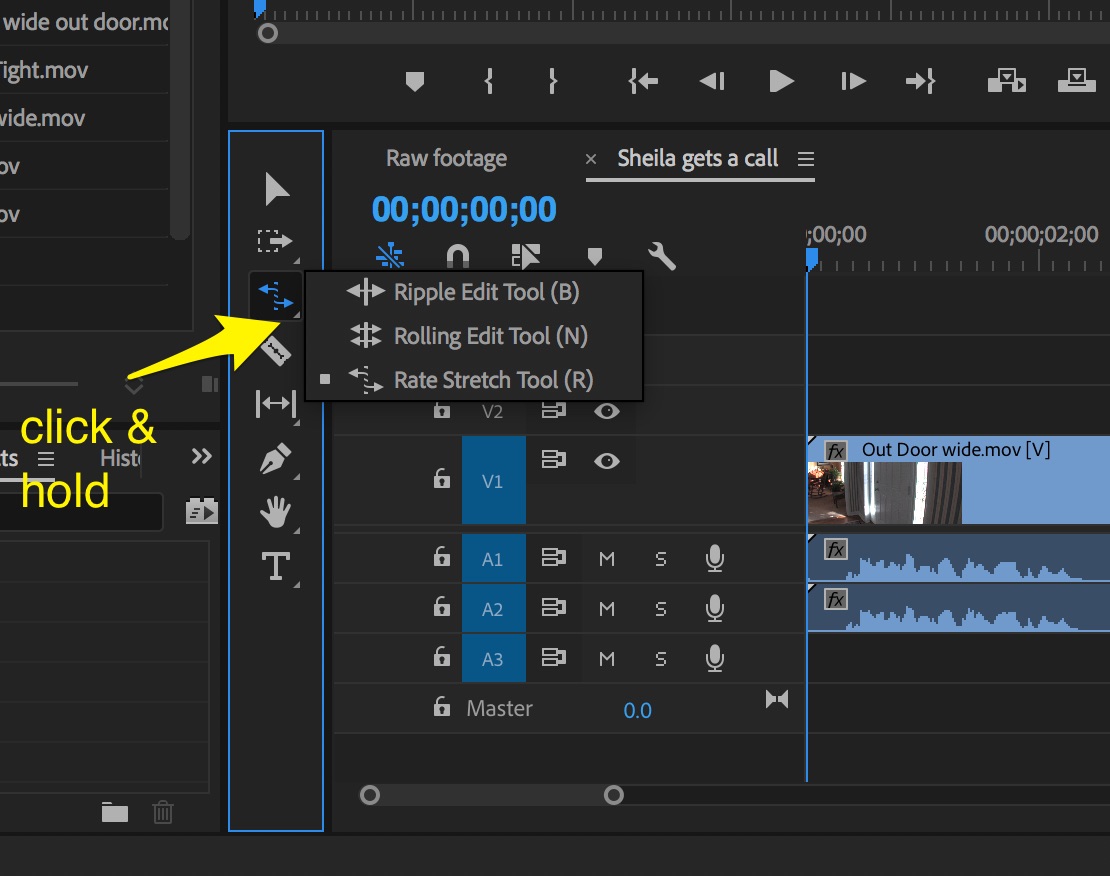
- Hover your pointer over the edit point between 3 Ballooning and 4 Ballooning – notice how it changes into a yellow arrow pointing to the left? Click on the edit point and drag to the left until it snaps to the Timing Bar. Notice 3 Ballooning got shorter and 4 Ballooning slid to the left without changing in length (called a Ripple Edit). This is one way you can adjust clips in the Timeline.
- Go back to the Toolbox and click on the Selection Tool (V) in the upper left hand corner.
- Now play until you hear Jennifer say, “… reckless and crazy to me.” and pause the playback.
- Drag the left side 4 Ballooning to the Timing Bar so the clip now ends at 00:00:15:04.
- Drag 5 Ballooning to the Timeline and bump it up against the 4 Ballooning clip and drag the end of the clip so it lines up with the end of the Jennifer 1 audio clip.
Add Natural Sound & Adjust Level with Keyframes
- Go back to the Bin:Stills and close it.
- Double click on the Audio folder to open it. Click on the Burner clip and drag it to A 2 and line it up with the end of Jennifer 1.
- Double click by the microphone in track A 1 to collapse that track and double click by the microphone on A 2 to expand it.
- Play the clip until the Timing Bar reaches Timecode 00:00:21:09 - yellow numbers in the upper left of the Timeline window.
- GOT-YA: Before you can add a Keyframe, YOU MUST click on the clip (Burner) to activate it. Now, find the Add Keyframe button right below A 2 and click on it. This should add a small yellow dot at the point where the Timing Bar intersects with the yellow line in the clip you just laid down.
- Click on the yellow Timecode readout, delete the current timecode and type + 120 and hit return. This should advance the Timing Bar 120 frames to the right.
- Tap the Add Keyframe button again to add another keyframe.

- Click on the keyframe you just added and while holding the mouse down, drag down on it until the number in the accompanying yellow box ends in -15:27 dB (or close to that) and release the dot. This is called an “audio ramp” and it fades down the audio.
- Move the Timing Bar to Timecode 00:00:22:11 and click on the clip Jennifer 2 in Ben:Audio and drag it to the A 1 track and butt it up against the Timing Bar.
- Close Bin:Audio and open up the Stills bin. Add the 6 Ballooning clip to cover the sound of the burner.
- Move the Timing Bar to 00:00:25:09 and grab the end of the 6 Ballooning to the Timing Bar. Take note; it doesn’t matter how long a still image is, you can always make it as long or short as you wish.
Finish Up the Project
- Open up Bin:Audio and drag Children’s Dance to A 3 track and butt it to the left side of the Timeline.
- Collapse A 2 and expand A 3. Hover the pointer over the thin line in the middle of Children’s Dance waveform and notice that it changes to a horizontal line with up and down arrows? Click on that center line and drag down until the number in the box is about -10 dB – you just lowered the entire music track so it doesn’t compete with the Jennifer’s narration but it is still present in the background.
- At Timecode 00:00:41:03 add a keyframe (be sure you have clicked on the Children's Dance clip to activate it before trying to add the Keyframe).
- Move the Timing Bar to Timecode 00:00:43:12 and add another keyframe and drag that keyframe up until the yellow box reads 0.00 dB.
- Go to the end of the music and add two keyframes to fade the music out – the final keyframe should be –00 dB.
- Finish the project by adding some of the unused images to your sequence. None of the images in the Timeline should be more than :04 seconds in length - this means you will have to cut them down, either before you add them or after they are in the Timeline. Try to put your edits on the beats in the music. You may use the images in the order they are numbered or use other images but be sure the images you choose work with Jenifer’s words. Pick your final image carefully, it should tell the viewer the story is over.
- Finally, click on the right end of the last clip in the Timeline, it will turn red. Click on the Sequence menu and click on Add Default Transition. This adds a fade to black at the end that echoes the audio fade out.
Extra Credit – Animate A Still
- Move the Timing Bar to Timecode 00:00:23:13 and set an In cue and move the Timing Bar to 00:00:26:19 and set the Out cue.
- Select 7 Ballooning and type . (period) to create an Overwrite Edit. When the Fit Clip window pops up, choose Ignores Source In Point.
- Set the same In and Out points and click in the light gray box around V 1 on the left of the sequence to “Turn off” the track and click in V 2 to make it active.
- Click on 8 Ballooning and type . (period). When the Fit Clip window pops up, choose Ignores Source In Point. This will overwrite the clip onto the V 2 track. Notice that when you play the sequence, the 8 Ballooning image now shows on top of 7 Ballooning – whatever is in the highest track is what we see.
- Move the Timing Bar to the beginning of 8 Ballooning. Be sure you have clicked on 8 Ballooning in the Timeline to make sure it is selected. Close the Bin:Stills window to give yourself more room to work.
- At the top of the Source window and notice there is also an Effects Control tab. Click on it to open that window.
- Click on the expansion triangle next to the Motion header – this opens the controlled for the motion.
- Click on the little stopwatch by Position and the stopwatch by Scale. Note that keyframes are added to the 8 Ballooning mini Timeline on the right.
- Double click on the image of the 8 Ballooning in the Program window to the right. Notice there is now a selection border around the balloon image.
- While holding down the Shift key, click on one of the corners of 8 Ballooning and drag to make it smaller. Keep dragging until the number next to Scale in the Effect Control window is 0.0.
- Now click on the tiny 8 Ballooning window and drag it on top of the center Tulip in the 7 Ballooning wide shot– the numbers next to Position should be – 456.3 127.5.
- Now move the Timing Bar to Timecode 00:00:25:25 (or just click in the Timecode window and type 25:25 + return) and click on Add/Remove Keyframe buttons next to Position and Scale – note the keyframes added to the Mini Sequence?
- Double click on the yellow 0.0 next to Scale and change it to 76.
- Change the numbers next to Position to 191.5 to 237.0.
- Now play that little segment and watch as the balloon materializes from the balloon in the sky and grows to fill the screen.
Submit Your Assignment
These instructions are only applicable for this assignment. When you are finished with this tutorial, upload Ballooning YourLastName PPCC_1 to the Ballooning Tutorial folder inside the J210 Spring 2017 folder in IUBox.
