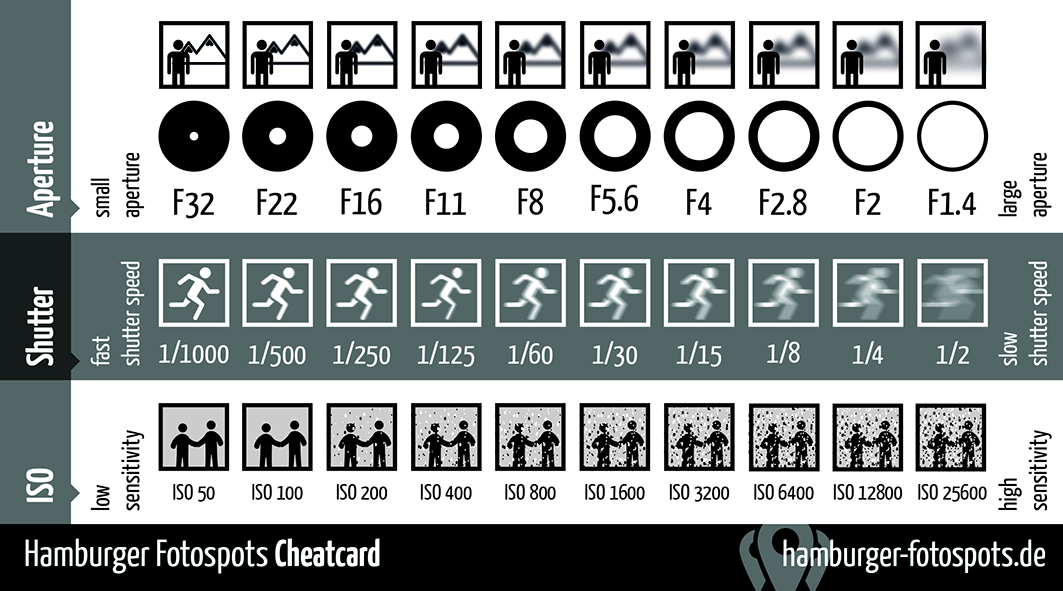
Exposure Triangle
Background
1. Exposure Triangle Exercise - 6 images
This assignment is about getting acquainted with your camera and its settings. For each of example shoot several pictures so you can choose the best for grading.
Shoot an image and then look at it on your camera. Ask yourself, is it in focus and sharp? Is it properly exposed? Is it not overly grainy? If you can't answer "Yes." to ALL those questions, take another photo.
***********************
Part 1 - The Exposure Triangle

Now it's time to visually demonstrate what these different settings do and why you might want to use different settings at different times.
Go somewhere bright - Don't shoot this in a dark room! Figuring out how to properly exposing an image is an important part of this assignment.
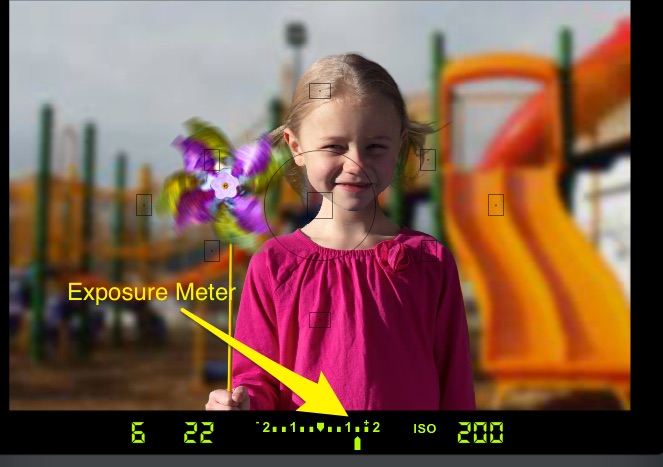
Pay attention to the Exposure Meter in your camera's viewfinder. To properly expose your images you always want to make sure this meter is in the middle. (You may have to tap the Fn1 button on top of thecamera to see the Exposure Meter.) You may need to adjust one of the points on the Exposure Triangle to bring this meter to the center.

For all these examples, make sure your flash doesn't go off.
1. ISO - images of the same subject
Find a pleasant, bright scene that has a good mixture of light and shadow. Set the camera's Mode Dial to P. Make sure NOT to use the flash for either image. Set the camera's ISO to 200. Hold the camera as steady as possible and take a picture. Now set the ISO to 25600 and shoot the exact same picture. In the P mode, the camera should adjust the other setting for you. Check your images and if they aren't good, retake.
2. Shutter Speed (Tv)
Find a fast moving subject that is traveling across the camera's frame (not toward the camera), like a car or someone on a bike. Set your Mode Dial to S. This setting means you are going to manually control the shutter speed and let the camera set the aperture. You may have to adjust the ISO to get a well exposed image.
Set your shutter speed to 1/30 (a thirtieth of a second) and hold yourself as steady as possible and take a wide shot as the fast moving object passes across the frame. You may have to take several shots to get a good one. The idea is to have a sharp background and a blurred fast moving object. You may have to readjust the ISO to get a well exposed image.
Set your shutter to 1/1000 and shoot a similar image, with the fast moving object passing across the frame. In this image, both the background and the object should be frozen and sharp.
You may need to adjust your ISO to get a properly exposed image.
3. Aperture (Av) - images of the same subject
Find a well lit scene with some depth to it (there should be at least 40 feet between the subject in front and the background). Set your Mode dial to A. Set your aperture to F5.6. You will will also probably want to set an low ISO, like 200.
Have someone stand two feet in front of your camera (you want to include their whole face - from chin to top of hair.) Place them on the left or right side of the screen. Focus on their eyes - remember to put their eyes in the center of the frame, push the shutter half way down to lock the focus and then, while still holding the shutter half way down, recompose the picture with the person's face on the left or right side of the frame. Push the shutter all the way down to make the image. Check your image and if it doesn't look good, figure out why and retake.
Now, frame your picture the same way. Set your aperture to F16 and focus on their eyes - remember to put their eyes in the center of the frame, push the shutter half way down to lock the focus and then, while still holding the shutter half way down, recompose the picture with the person's face on the left or right side of the frame. (You may have to adjust your ISO to get an acceptable image - choose a higher ISO if your image is dark.)
In the first image, the face should be sharp and your background soft. In the second image, both the face and the background should be sharp.
